Next Passion
I have finished painting the v berth area and the cabin top and sides of our Didi 40 Cr. There is four or five coats of paint depending on the area and the standard of finish I want. Under the berth it is all epoxy while in the living spaces I am using International Toplac. There is still a lot of painting to do. The lockers need a final coat of two pack epoxy gloss while most of the under deck area in the main cabin needs the last coat of Toplac. That still leaves the bulkheads and locker fronts to have their final undercoats and top coat but that will have to wait until the water tanks, settee seats, engine enclosure, fridge and kitchen benches are completed. This week should see enough of the painting finished that we can start bolting on deck and cabin top fittings, hatches and portlights and clear some of the rumpus room and sun room of fittings.

V Berth painting finished. Now I can install the varnished bunk tops.

The ceiling and cabin sides of our Didi 40 Cr are painted ready for varnishing the laminated beams.

The ceiling and hatch in the V berth ante room.

The clean underside of the deck painted and holed drilled ready for screwing on the genoa tracks
When we poured the lead into the structural steel fin of the keel the heat from the lead distorted the 5 mm steel plate forming vertical ridges between the internal vertical steel structure. This week the fabricator let us use his paint shop to bog and fair the keel in preparation for shipping to the dock. On Monday, Tuesday and Wednesday we added epoxy bog of different thickness to the hollows and today I completed the sanding and applied two coats of Interprotect. Next Tuesday we will turn the keel over and do the other side. Back on the hull I have finished the seat in the V berth ante room which will be the home for the hot water system. The cross frame that forms the front of the seat is bogged to the hull and fastened with cleats to the hanging locker and the mast support frame. It is all painted except for the base for the water heater which needs another coat so now I can complete the floor in this area. The other hanging locker on the quarter berth ante room had been grouted to the hull too. Because the bottom of the front of the locker lands on a stringer there was not a large filleting area so I glassed over the fillet to make it stronger. There is still a little return to do at the top to form a tiny shelf for items you want close at hand.
I have decided to swing the head door out the same way it does on our Jeanneau SO37 Passion. This means a small adjustment to the top of the door and a small repair to the top of the door frame. I have done a trial hang of the door so i know the top is going to work OK. What I do not know is if the bottom edge of the door will clear the engine cover and kitchen. The door is quite a bit wider than on Passion so there is scope for narrowing it up in the lower section below the kitchen bench height so it is still a work in progress.

The keel of our Didi 40 Cr filled and faired on the starboard side.

The first of two coats of Interprotect over the epoxy bog on the keel of our Didi 40 Cr

The delta bulb on our Didi 40 Cr has a tonne of lead inside the steel former. The bulb is particularly fair and needed no filler.
After a mammoth effort of sanding and two pack epoxy painting I have finished some areas of our Didi 40 Cr enough to install fittings. The starboard locker, the gas bottle locker, the area under the quarter berth and the quarter berth top lockers as well as the head hanging locker have had their final coat of semi gloss epoxy. With that done today with Kevin’s help we installed the back stay tangs, the stern shower panel, the transom engine vent cowl, the fuel tank breather and the VHF antenna for the AIS system. These are all on the transom.
Next we installed the Shore power plug and the RCD cabinet ready for a licensed electrician to wire up the 240 volt circuits. On the stern quarter we installed the engine exhaust fitting and secured the exhaust hose. Later in the day I connected all the exhaust hose back through the water lock muffler to the engine wet exhaust. Bar an extra hose clamp the exhaust pipe is finished including strapping the water lock muffler to the keel.
Before Kevin left we installed the manual bilge pump in cockpit and the engine control cables. We had trial fitted the engine controls before but had to relearn the process with a few false starts. Now it is complete with the throttle and gear shift working as they should. I had hoped to get the fuel lines fitted but it was a big enough day and I was pretty tired from climbing in and out of the locker. There is no way that these are one man jobs and I am very appreciative of the help.
Looking ahead there is another days work fitting cleats and pad eyes but beyond that I have to get on with the undercoat and top coat in the saloon area before we can have a major assault on the rest of the fittings. Next week we will start the final fairing of the keel so I am not sure how much time I will have for painting.

Our Didi 40 Cr topsides painted with Perfection but not perfect. Still very happy with the result

A bit of the starboard side of our Didi 40 Cr after painting today.
For the first time in at least a month we had perfect painting conditions today. The 50:50 undercoat and topcoat mix had cured enough for a light dry sand with 400 grit paper and the surface was wiped down with a tack cloth. The first side was painted when the O rings in the spray gun gave in to the strong solvent and blocked the air flow. This was rather inconvenient as I had already mixed the second batch of paint. When I realised the spray gun was not recoverable I reached for the spare and found that blocked. Fortunately I usually expect the worst and had a brand new back up ready.
Now the new gun worked just fine except that the paint flow was a little greater and I was putting on little more than I had with the old gun. I soon adjusted the number of passes but in the transition from slow gun to fast gun I have a section where the paint is a little thicker than ideal.
Post the painting I recovered the No 2 gun and will give it another clean before putting it back into storage for another ten years while the gun with the dud O rings will have a quick trip to the dump. Memo to self. Don’t leave the gun full of solvent overnight.
After lunch I mixed up the last of the Interprotect epoxy primer for painting the second coat on the underside of the deck in the saloon area. That done I had had enough of wearing gas masks all day and took to the garden.
Now I have been neglecting the garden during my boatbuilding but I need a place to store all the offcuts until we get a bin to take everything away. As my storage place was overgrown with weeds the logical solution was to get out my 35 year old two stroke trimmer and do some power weeding.
On the upside the garden will look neat when I take all the tarpaulins down and remove all the masking tape and plastic off Passion X.
There is still some two pack epoxy to paint in the bilge areas but for the most part the rest of the interior painting will be single pack paint and I have an enormous area ready for undercoating.
I hope that the top coat of two pack polyurethane turns out as well as the first undercoat. Friday was marginal painting weather due to the breeze but under the tarpaulins I managed the first coat of undercoat quite well and am pleased with the result. The weekend was for Laser sailing with both days gusting up to 25 knots so by today I needed a rest. After coffee we found a package on the front doorstep and it was the mast base for the new rig. It is a very fine base indeed and the Ronstan blocks fit perfectly on the swivelling studs.
For a rest I picked up the mainsail and boom bag and some more top coat for the topsides. Hopefully that is the last I will need for the exterior. After the weekend the undercoat was ready for sanding and this afternoon it sanded down very well. The overspray on the masking plastic sheets was however peeling off in thin flakey pieces so I had to remove all the masking and will need to redo it for each of the next two coats.
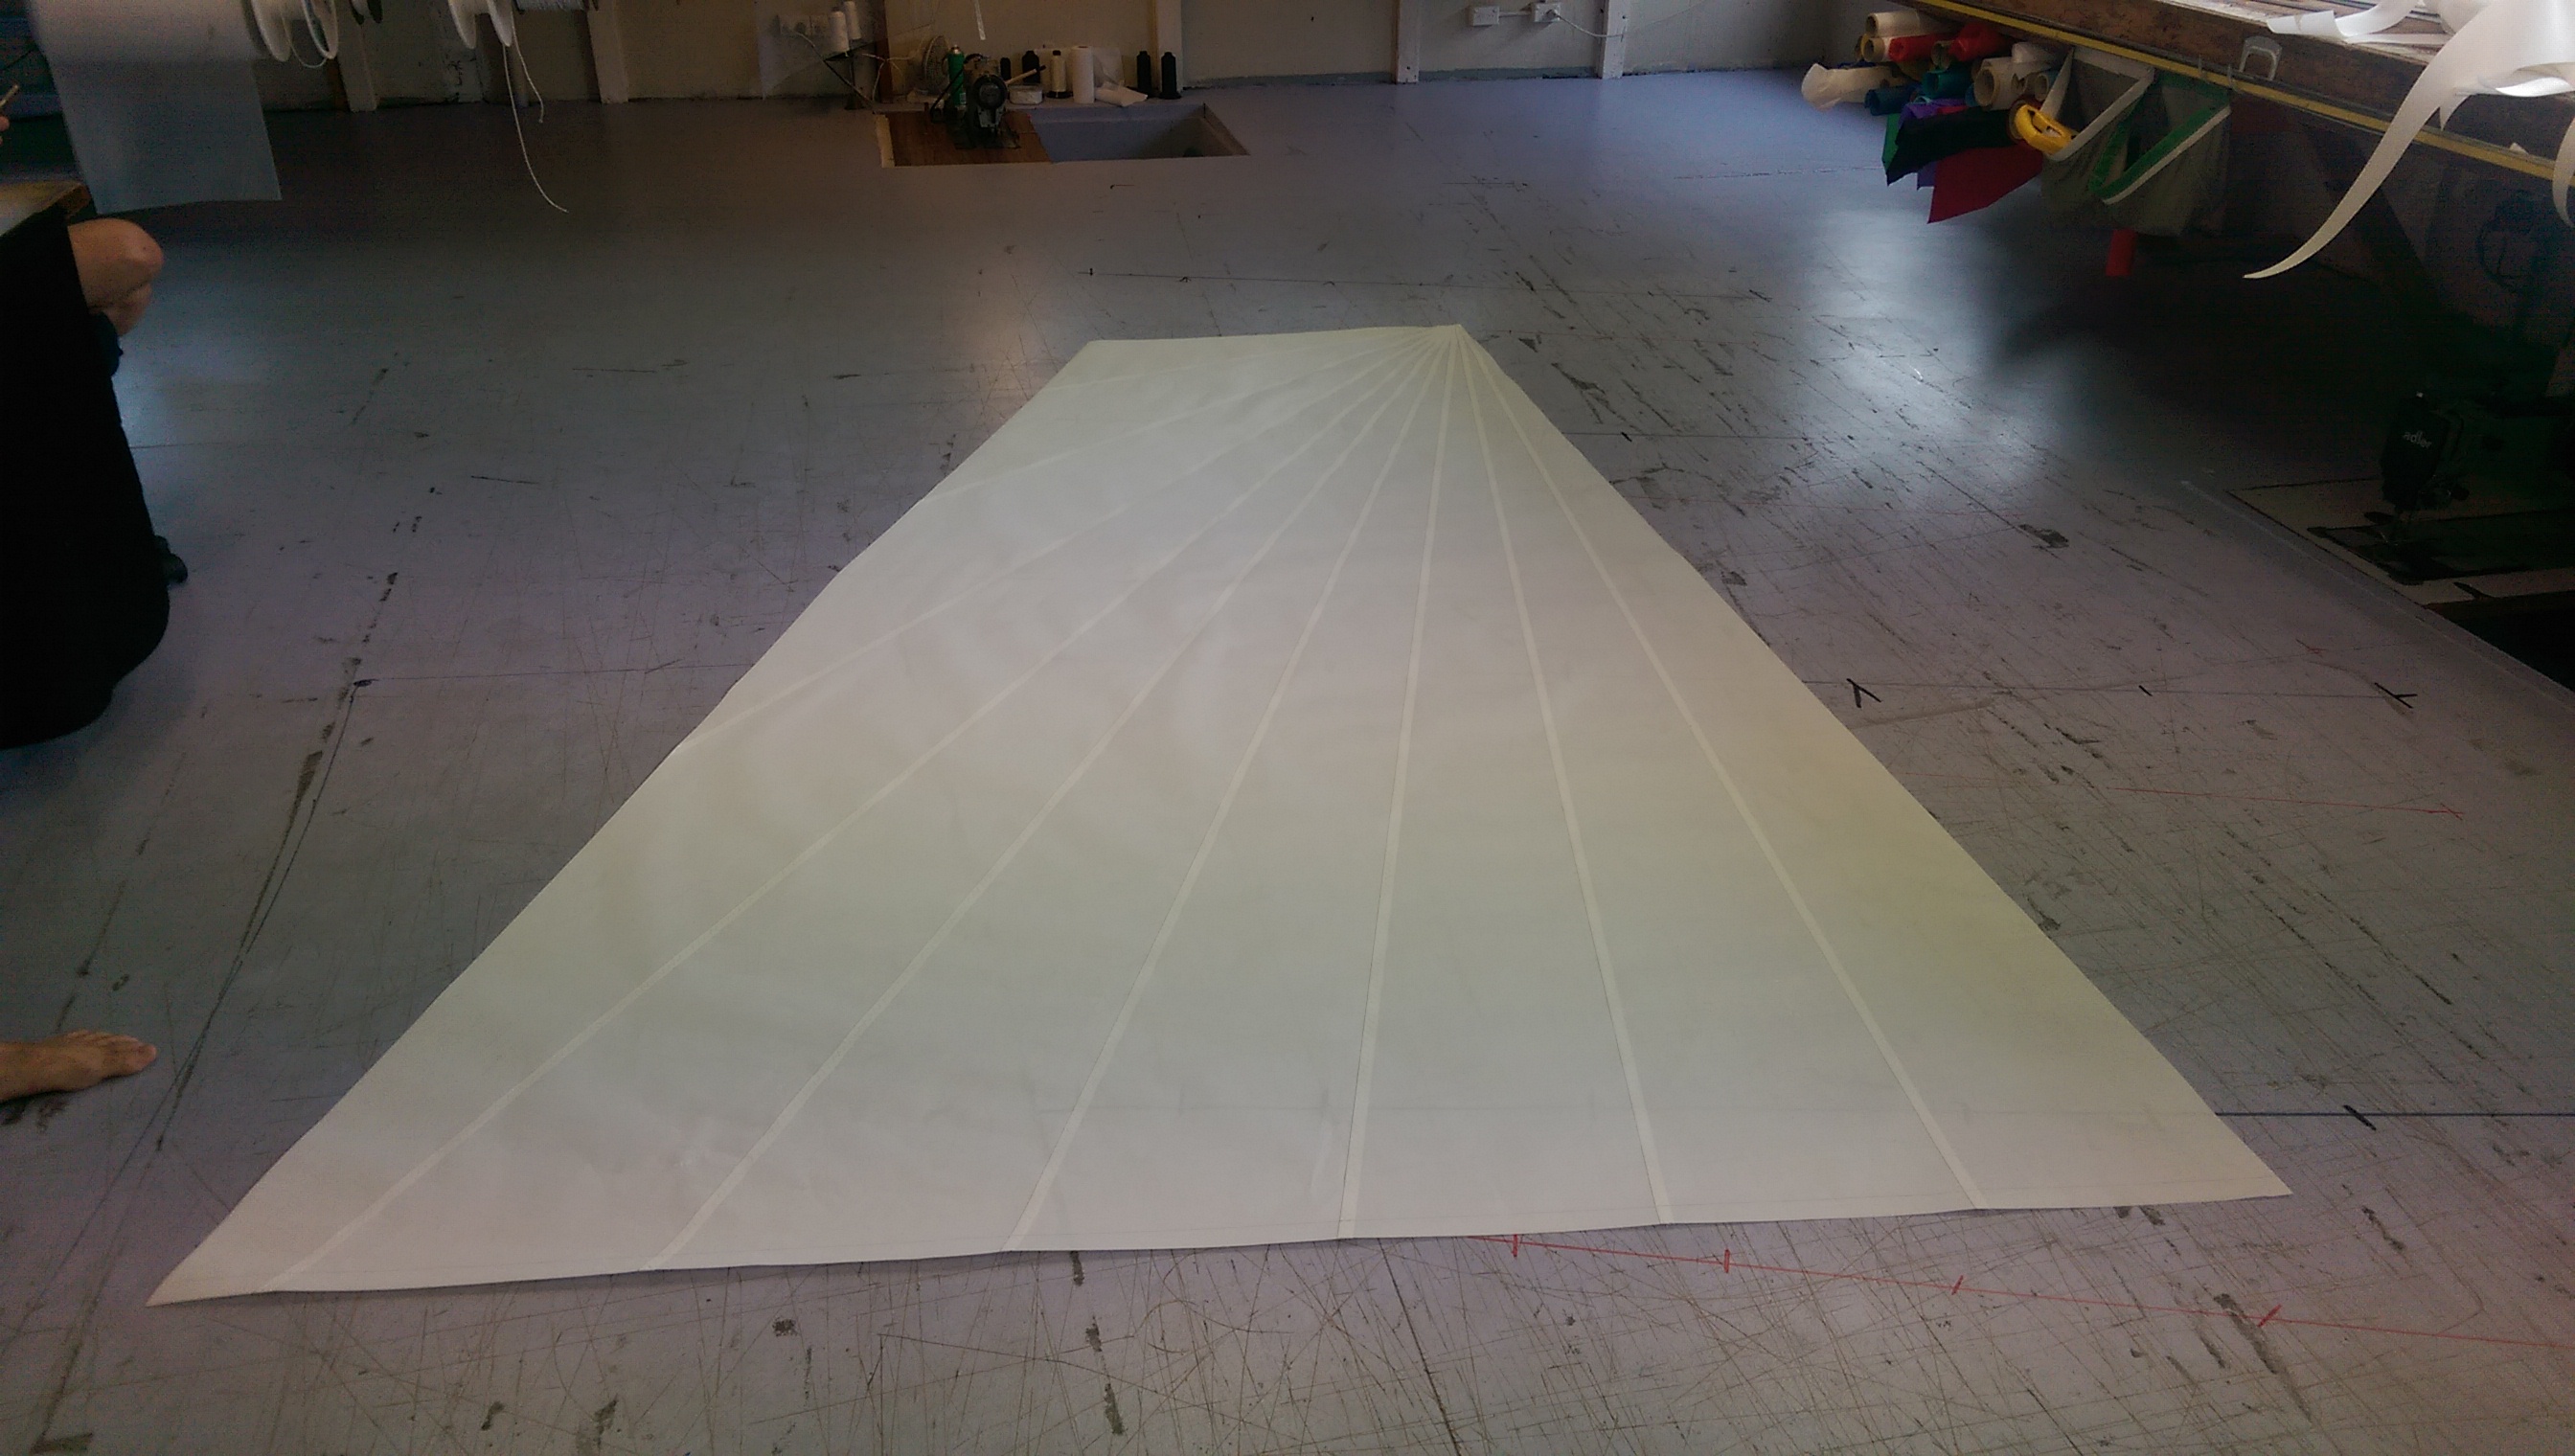
The new mainsail was laid out for inspection and the ball slides for the batten ends removed from the cruising sail and added to the new racing main. It is a big sail and weighs 32 kg so we will want to put it on the boom once and leave it there.
For interest I photographed the cruising main on top of the new one. The cruising main started life as a large roach main on the standard SO37 rig. We added 1.7 metres to the mast height and extra panels were added to the foot. It worked very well so I had another 900 mm added to the foot so we could use it as a cruising main on the Didi 40 Cr in case we should we ever take off for a long cruise.

Very happy with the two pack polyurethane undercoat on our Didi 40 cr

A very nice mast base was on the doorstep this morning

The new fat head main with the pin head cruising main sitting on top

This shows the size of the original SO37 main compared to the new fat head main on the Didi 40 Cr

Aggressively sanded first coat of primer in the quarter berth ceiling

2 mm of epoxy glass across the keel of our Didi 40 Cr to be sure to be sure.

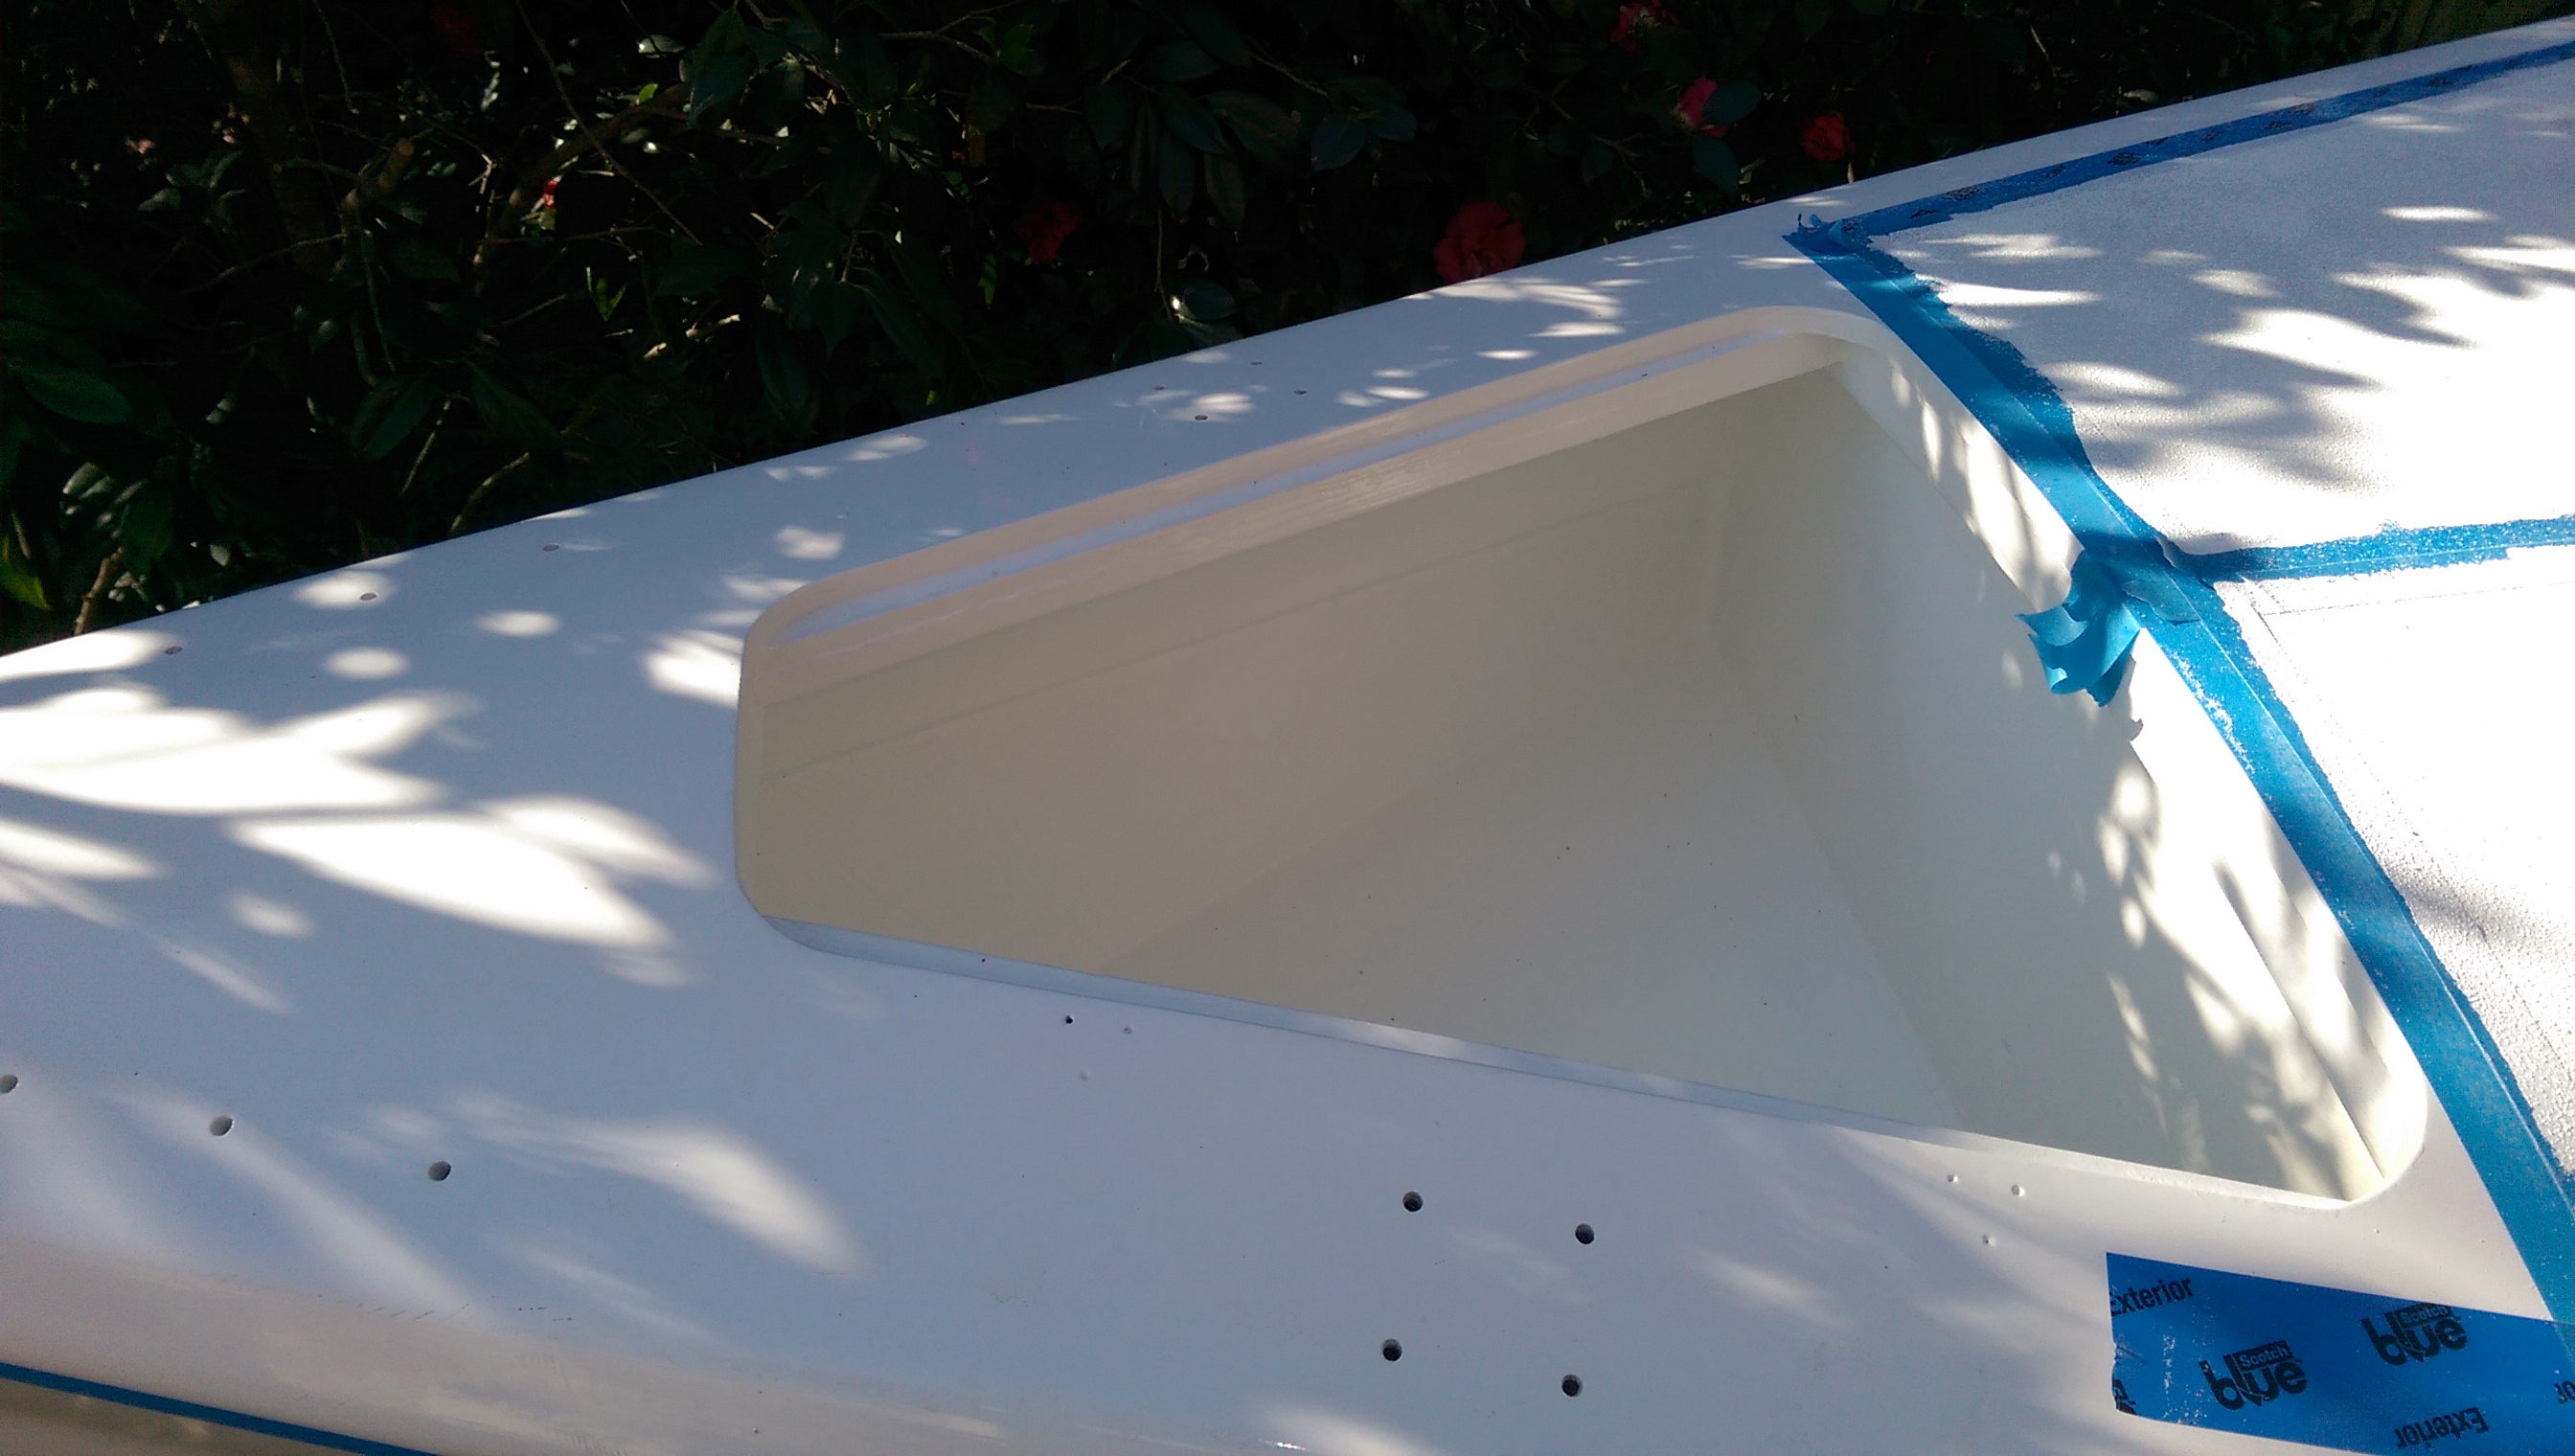
Two coats of primer under the V berth deck of our Didi 40 Cr brightens up the whole area. The colour will be softened by the light grey mattresses and side cushions. The hatch fits just perfectly.
It is like groundhog day around our Didi 40 Cr yacht. Every day I wake up and have to sand the same parts of the boat. Sand the raw timber, sand the primer, sand the second primer, sand the undercoat but at least that should be the end of the cycle. Today for variety I sanded the topsides from stem to stern with 240 grit paper on the random orbital sander with the vacuum dust extraction. At least that was out in the open and I was able to stand for much of the operation. The topsides are now ready for the first coat of two pack polyurethane undercoat which will go on the first fine still day.
Inside I sanded the underside of the deck in the V berth area and in the lockers on both sides. That is a tricky operation requiring a certain flexibility and patience. The random orbital sander did help to speed up the job but there is still quite a big of hand sanding needed.
I completed the last of the filleting of the locker fronts to the hull and deck over the past two days so the underside of the deck and the fillet areas of the lockers got their first coat of primer. One more coat in the lockers and I will be able to undercoat the whole of the V berth area back to the mast step.
Back in the quarter berth I added 2 mm of epoxy glass to the last section of the keel. The keel now has either 12 mm ply or 2 mm of epoxy glass across the grain on the inside. This matches the 9 mm ply plus 1 mm of glass on the “V” on the outside of the hull forming a sandwich. The interior cross grain reinforcement is not required by the design but if it is a good idea for one side of the timber then it is even better on both sides.
The last task of the day was to add a second coat of primer to the roof over the V berth and take a photo. Using a roller and brush it is not too difficult and even inside the lockers the roller works quite well.
I have rescheduled the launch date to post Christmas. I never expected it would take a month to paint the deck but it did and I figure it will take a month to paint the insides even with the head start I have with primer over most of the furniture. I need to finish painting the undersides of the deck and cabin so that all the fittings can be bolted on. There is little point in launching on Christmas Eve and then going to Adelaide for the Laser sailing so mid january seems like a good time. The Dock was very happy to reschedule as they are very busy to Christmas and the mast manufacturer had not started so it seems they are both happy.
In the meantime the mainsail is finished ready for inspection and the boom bag should be done by the morning

At last i have non skid on the deck.

Non skid finished except for the cockpit floor and boarding platform which will be in light grey.
Friday started as a bright sunny day and despite the possibility of rain I applied the last coat of two pack polyurethane to the non skid area on the deck. Rolling the overcoat on the non skid was a quick process and I was soon having a morning coffee and reading the Financial Review. Mid morning the clouds rolled over but the rain stayed away all day much to my relief. It took longer to remove the masking tape and touch up the gloss stripes between the non skid patches than it did to do the whole deck but by evening the job was finished and the paint well dried. In between I was patching and undercoating the cabin sides inside and also started priming the ceiling in the V berth area so I was pretty exhausted by the end of the day. I had hoped to get up to the gloss on the cabin ceilings but some last minute spot filling was needed and that did not cure in time.
It has taken a full month to do the deck with four coats of primer, two of undercoat and two of top coat. I had to do the cabin top non skid separate from deck non skid just so I could work safely around the deck. The undercoats and top coats needed two days cure before they could be sanded so the time just dragged on. The end result is pretty pleasing and the cabin top has had long enough cure to be able to be walked on. In a couple of days the deck will also be trafficable and at last in safety.
I have been working to fit in with the variable weather. Saturday was a nice sunny day with little breeze so I gave up my afternoon Laser racing to overcoat the non skid on the cabin top with a second coat of two pack polyurethane and spray an extra coat on the cabin sides. The job did not go to plan as some of the non skid material was displaced with the spray gun air flow and ended up in the gloss coat on the sides. Sunday was a good day of Laser sailing at Middle Harbour Amateurs and Monday was a good day to repair the damage. I removed all the masking to make sure all the loose non skid material was out of the way and applied a second overcoat to the non skid and redid the cabin sides. It is not perfect but it is as good as I am going to get working in the open air.
Tuesday was windy with so much rubbish blowing around that painting and even sanding outside was not practical. I did lots of sanding inside including the anchor locker and applied two pack epoxy in the anchor locker and the bilge area under the locker. It has had a second coat since and so the first metre and a half of the yacht is completed.
On Wednesday it was at last a sunny day and the wind was not blowing the clothes off the line. With all the non painting weather I had quite a bit of boat sanded ready for painting on the inside. I was up at seven drying off the deck and masking up the non skid areas. A quick sand with 240 grit and a second layer of tape later I was ready to apply the first coat of non skid to the deck. That went well and now there is just the boarding platform and cockpit floor to do. The deck still needs a second coat of two pack polyurethane but that will be a quick job. Later in the day I applied the first coat of primer to the cabin sides and then it was time to rest.
Today was also wet so I ran some errands picking up all the fuel lines, some more paint and extra cartridges for the dust and gas mask. As the rain abated the primer on the cabin sides was sanded and a second coat applied. With two coats of primer on the ceiling and cabin sides the cabin is looking much whiter and brighter.

Non skid completed on the cabin top and first coat on the deck
At least the anchor locker is finished.

Lots and lots of epoxy in the bilge area under the anchor locker

Cabin sides with one coat of primer and ceiling with two

The cabin of our Didi 40 Cr is looking white and bright.
Just one coat of undercoat and a top coat to go and I hope the cabin ceiling and sides will be complete.
The forecast is not good for topcoating the non skid on the deck with more two pack polyurethane but there is lots to do whatever the weather.
The top coat of two pack polyurethane paint on the yacht has cured nicely so I have been able to sand the cabin top ready for the non skid. It was all masked out ready when black clouds came over and dumped rain on my work. I retreated inside and masked up more or the cabin timber that will be clear finished and applied more epoxy primer. I did a bit more epoxy filling and faired all of the carlin area ready for primer. With two coats of primer on some of the ceiling panels the cabin is looking lighter and brighter.
I am debating with myself whether or not to cut back the cabin side paint and put on a third coat so I put the portlights in to check the appearance. Still undecided hence time is the enemy of perfection.
Some panels have come up just brilliantly. These are the areas where I had applied two layers of 6 oz cloth with epoxy resin. The extra thickness of the epoxy glass meant I could sand out most imperfections in the plywood. For weight saving I did not cover the cabin sides with epoxy glass so the finish is not as flat. When I apply the non skid to the cabin top there will be a second layer of paint applied over the top so I might give the cabin sides a third coat, because I can.
Meanwhile the mainsail is in production and I am very pleased with the Hydra Net Radial cloth we have selected.

First look at our Didi 40 Cr paint job in daylight.

Trying to make up my mind about a third coat on the cabin sides so I put the portlights in place for a photo.
The top panel of the mainsail showing the modest fat head.
After a weekend of sailing it was back to sanding the undercoat on Monday. We did take time out to get the car serviced and to have coffee but the rest of the day was sand away. Today there was more sanding before applying two coats of two pack polyurethane topcoat to the cabin sides, gunwales, coamings, cockpit seats and transom. The cabin top has a single coat as I could not get to it to do a wet on tacky second coat as I could the rest. The rest of the deck and cockpit floor will have non skid with the pain roller applied and the non skid shaken on. The weather forecast is for another good painting day next Tuesday so I might try and get the undercoat on the topsides that day.
Meanwhile Elaine had bought a nice colour coordinated doona cover to go with the light grey we have selected for the seat and mattress covers. We are thinking of mid grey towels with the yacht name in yellow stitching.

First glimpses of the finish on the cockpit coamings of our Didi 40 Cr

Elaine showing off the colour coordinated Doona cover for the quarter berth of our Didi 40 Cr
It took a day and a bit to sand the first two pack polyurethane undercoat to my satisfaction and half a day to put on the second coat. Painting the deck and cabin is a lot more difficult than painting the hull. For a start the hull was fully fibreglassed and then bogged and filled where required. Then a sandable primer was applied to the round bilges to take our the last fraction of a millimeter bumps. Then there are all the angles and corners to do.
Only the Interprotect two pack epoxy primer has been used on the deck as much of it will be covered in non skid which will hide the small imperfections. Martin says that the high gloss of the finish on the cabin sides will reflect the light and any small deviations will not be noticed. The gunwales which are a pretty solid construction have sanded up well and after two coats of undercoat I am confident that I will be happy with the finish gloss on those bits.
I did a better job of applying the second coat of undercoat but there are still a few runs which will have to be sanded out before I can apply the top coats. The top coats will be a two stage affair with the glossy bits completed first and the non skid areas done one at a time. I will have to let the glossy bits cure enough to take masking tape for the non skid areas. I am keen to get the non skid on the deck for obvious reasons.
To protect the deck from flying debris I raised a second tarpaulin along the long side of the awning and now the hull is protected on three sides. With this added protection finishing the topsides should be easy.

The first coat of undercoat was surprisingly glossy but I did get a lot of runs in it.

The second undercoat used just as much paint but was a better job which took a lot longer to apply.

I am surprised at how glossy the gunwales are and am pretty confident the top coats will be ok
It seems like nothing has been accomplished in the past six days and while I know that is not true there are no new photos to show for the effort.
With help from the crew we have masked the cabin roof beams, sanded the fourth coat of primer and drilled more holes. This time the holes are for the toiled system and somewhere I have the size of backing ply written down and somewhere I have the size of the box I need to fabricate for the holding tank written down.
I have achieved a few things. I have worn out two random orbital sanders and bought a third which I hope will last to the end of the project. Elaine and I have selected a nice light grey covering for the cushions and mattresses. I have taken Martin’s advice and touched up the oversanded areas of the primer with light brush strokes. This worked out better than I anticipated. On the other extreme I have ignored his advice and done a second round of patch filling on the gunwales and given them a second extra coat of primer. The acrylic washboard has been drilled for the lock and the sliding hatch has had a slot routered to match the lock. It looks just like the lock on Passion.
With paint left over from priming the gunwales I have rolled and brushed the first coat of primer on the ceiling in the cabin. Also with paint mixed up for the gunwales I have sprayed the last coat of primer on the deck locker lid and the hatch garage. It would be nice if the boat was under cover and I could spray the lot. The neighbours are taking off for three days tomorrow but the weather is turning wet and the opportunity to spray may go missing. We will see what the morning brings.

Locker lid and hatch garage have been sprayed with primer.

The deck primed last week. Since then it has been spot filled, sanded and the gunwales have had two extra coats of primer.
Saturday was fine but the breeze was gusting 25 knots plus making working outside almost impossible. I tried some spot filling over the first coat of primer but there was so much rubbish flying around that the patches picked up dust and bark and leaves. In the garage there were jobs waiting for such a day. The first cab off the rank was the toe rails which planed, routered, sanded and epoxy coated. I collected half a garbage bag of wood chips from that exercise when I cleaned up the garage for the next job. Elaine was out so I borrowed the car port and shifted some gear there to make room in the garage for shaping the rudder. Three hours and another half a garbage bag of wood chips later I was done for the day. The rudder had been sitting in the garage waiting to be shaped for 362 days. There is still some hand planing to do to finish the job but it should soon be glassed and painted and banished from the garage.
Sunday Monday and Tuesday were all great days for sanding and painting. Each day I managed to machine sand the whole deck and apply a coat of epoxy primer. Tonight she has four coats of white epoxy from bow to stern. The random orbital sander with the vacuum cleaner attached to suck away the dust has been a great time saver. The coat applied tonight still needs some spot filling and then sanded with 240 grit before the undercoat is applied.
I need a rest so tomorrow I can take it easy on the Winter Wednesday race at RANSA.

Rudder carved with Makita planer and angle grinder. Toe rails planed with Makita planer and edges routered with Ryobi router

Section at the top of the rudder

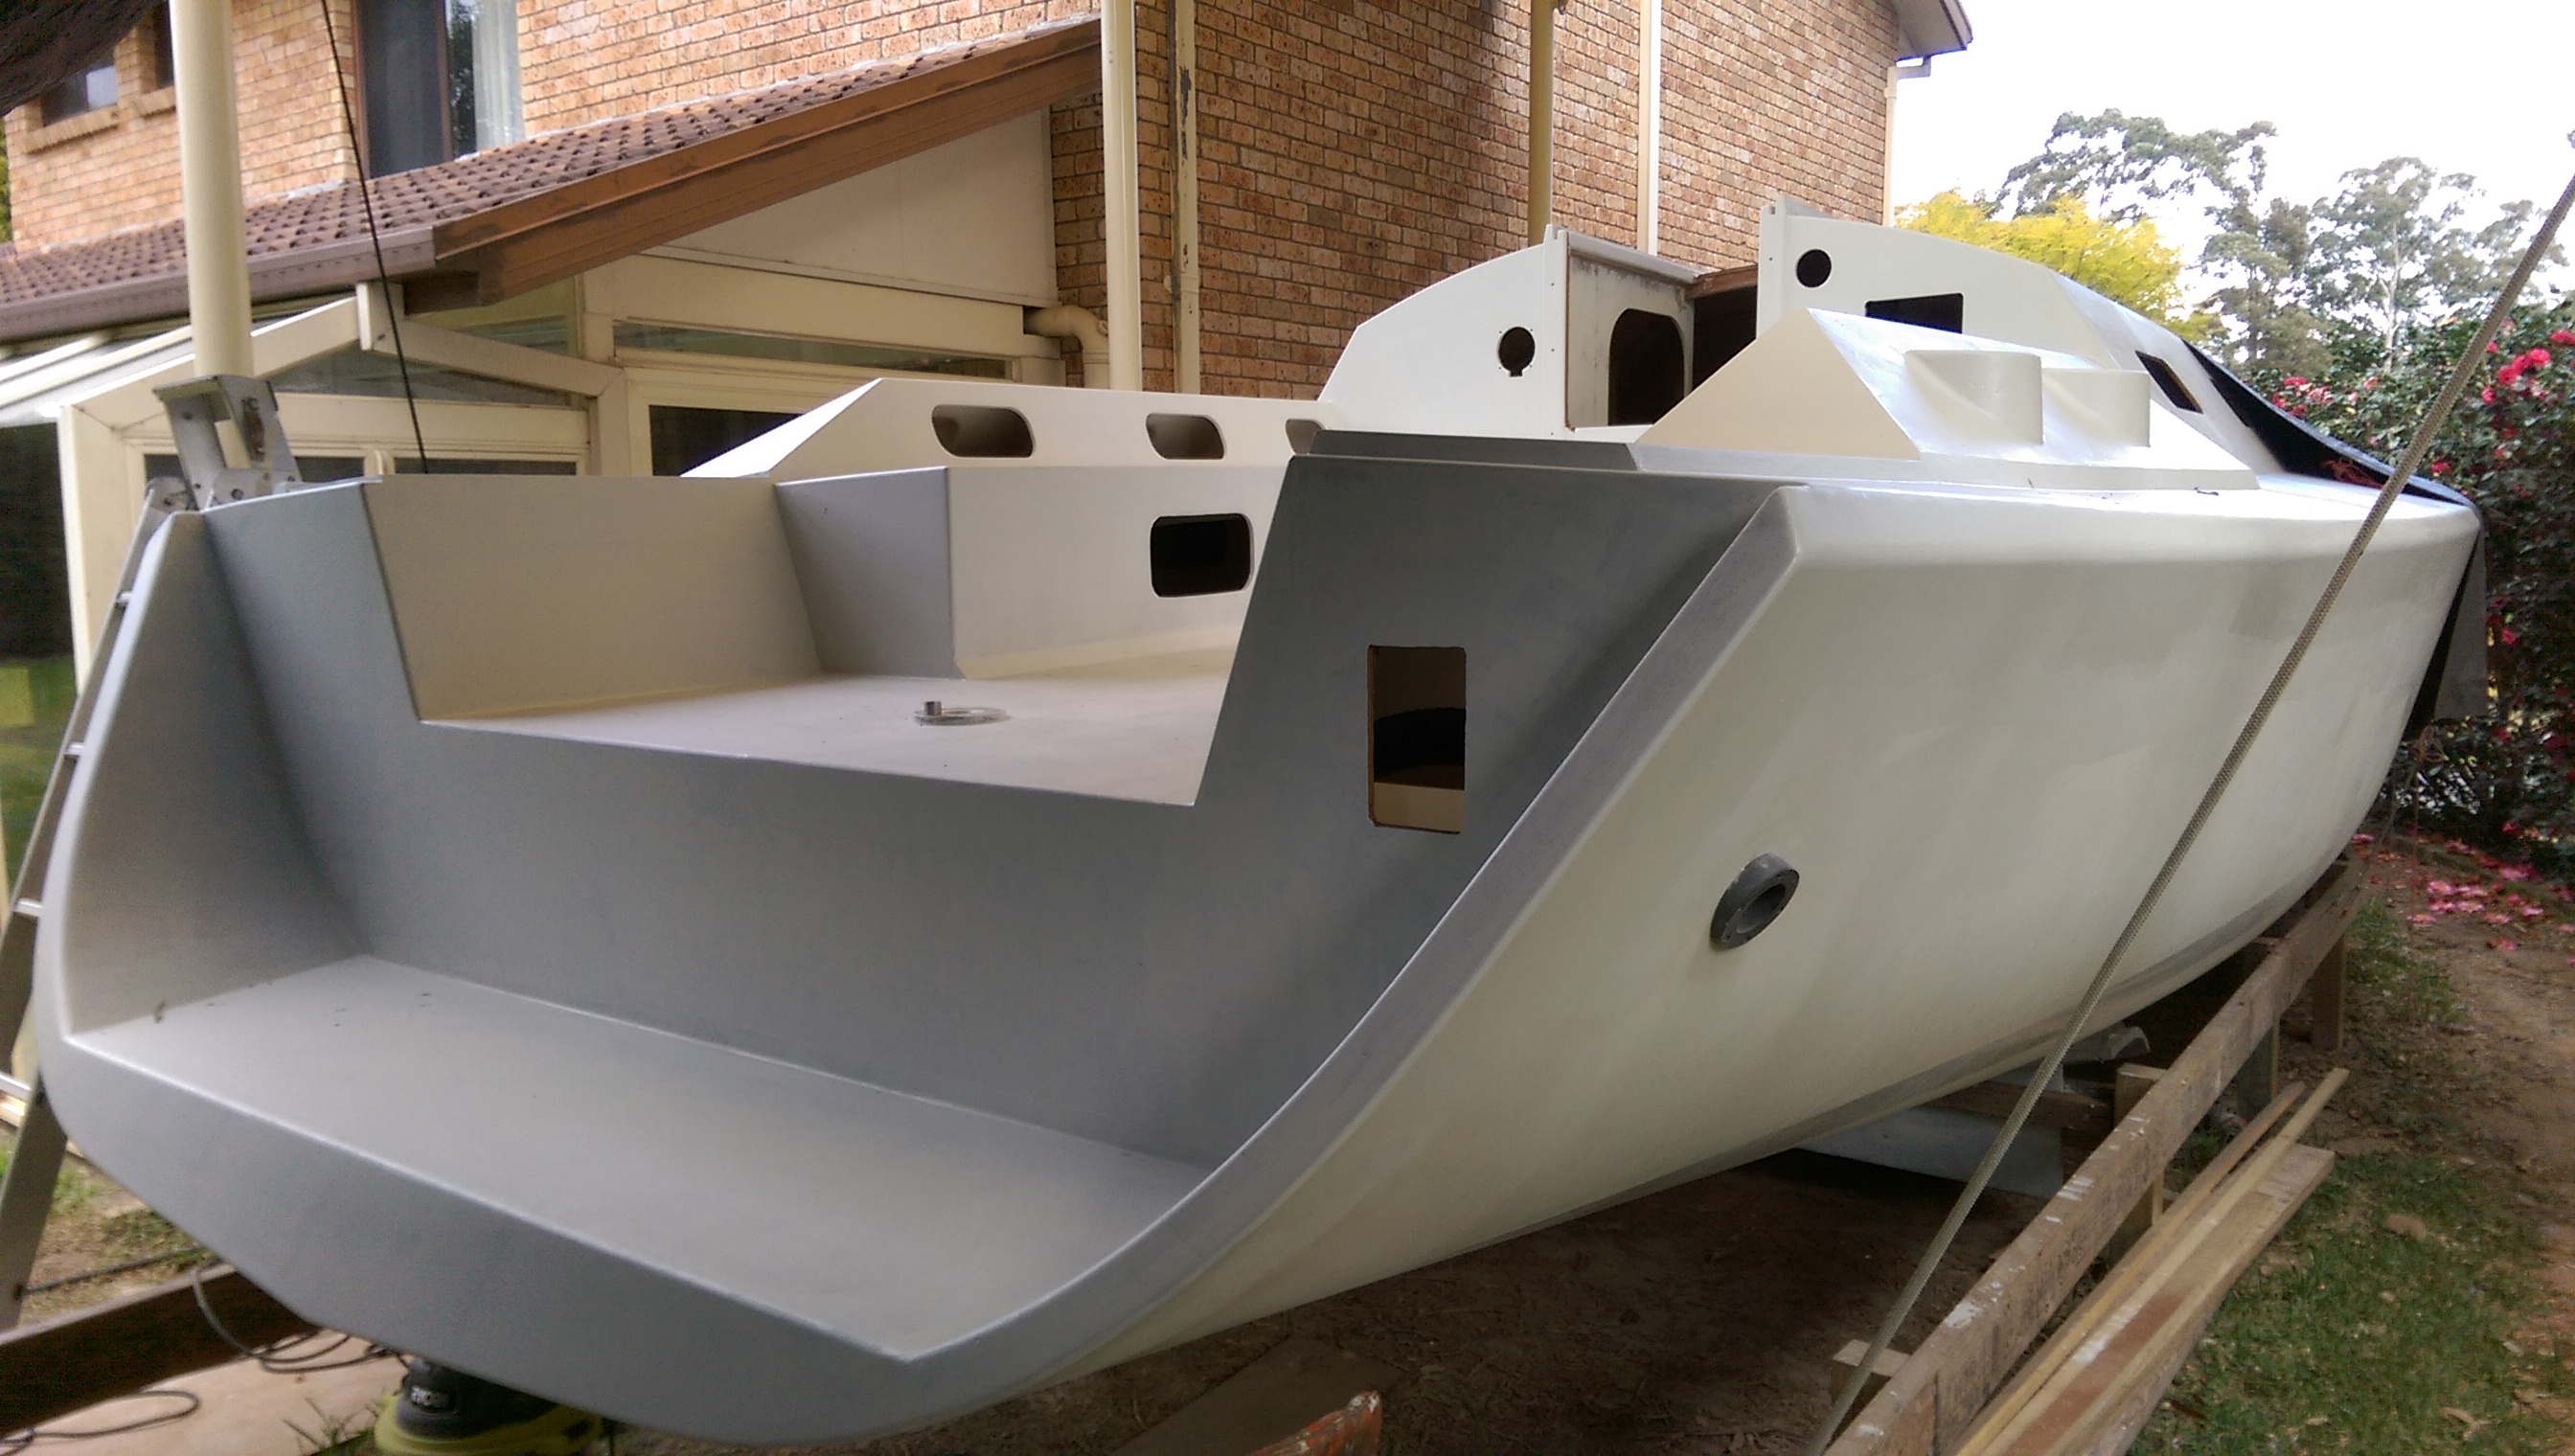
Passion X all covered in white epoxy primer. This was taken after two coats and it now has four coats.
I am still recovering from the effort on Monday and Tuesday to get the yacht sanded and primed. On Wednesday morning I completed the first coat of primer on the transom and used up the rest of the mix for a second coat around the cockpit seats. As I dashed out of the door to drive to the Winter Wednesday sailing I took a photo of the painted transom from under the tarpaulin so it does not show a lot of the boat but it is good for the record.
Winter Wednesday racing was a challenge as I needed to rest but we needed another good result to wrap up the pointscore. The big black genoa was still soaking wet from last week so I was tempted to use it despite the forecast for seventeen knots. The crew had been reading other forecasts and were sure it would be OK and as we were going for broke I fell to the temptation. The weather had its own plans and soon it was honking in with regular plus 20 knot gusts so even before the start we reefed the main and pulled the backstay down hard to bend the mast and flatten the main.
It was an odd wind direction being from the North and predicted to swing via the North East so we tight reached up the the heads and broad reached back to Steele Point. As the breeze lightened on the reach we shook out the reef and poled out the genoa for a dead square run into Rose Bay. Our start had been well timed and we were at the windward end of the line. From the start we climbed high for clear air and were rewarded by passing Larrikin our nearest pointscore rival. Izzi started lower but had good speed and a clear air patch so she beat us to the heads and all the way home.
As we rounded the mark in Rose Bay to come onto the wind the wind strengthened all over the course so we put in the reef again giving the crew a very good workout.
By the finish line we were pretty pleased with our effort as we had beaten Larrikin off the stick and looked line ball with Aggrovation who had been strongly recovering from a blanketed start all day.
We were even more pleased when the results came out and we had scored 6th place just 7 seconds in front of Aggrovation who tied with two others.
Larrikin and Allegro were further back on handicap so we have wrapped up the series with three races still to go. It is just as well as we have exhausted our bag of tricks and probably our unfair share of good luck over the series. The handicapper has now doled out consolation prizes to our competitors in way of better handicaps so any good result from now will be magic.
To top off the week Kevin gave me a hand on Thursday to drill a whole lot of holes in Passion X for the engine ventilation, the water and fuel tank inlets, the VHF cable run for the stern mounted AIS antenna and the manual bilge pump. Some jobs are more than twice as fast with two working on them and I appreciate the support with the decisions on where we are going to mount gear.
Awful rain today restricted work to shopping and sanding the hatches in the garage but I did get to book a launch time slot in the second week in November, contact the carrier about the trip to the water, did accept a quote for all the cushions and mattresses and did deliver plans for the pushpits and pulpit. I am hoping for the weather to clear so I can get on with spot patching and the second coat of primer.
The first coat of primer on Passion X before the rain came.

Our Didi 40 Cr Passion X sanded ready for painting.

The paint ran out just as the daylight did and by the time I had cleaned up I had to take the photo with the flash in the dark

First coat of epoxy primer on the deck of our Didi 40 Cr
After a successful day sailing Passion last Wednesday when we scored a fine third place I was off to Perth to catch up with Dad and the family. I needed a break from sanding and did enjoy it.
Our good result on Wednesday was a bit of a surprise as we knew izzi and Aggrovation had beaten us but when the results came they were the only ones to get through. Our third place just a few seconds in front of Larrikin increased our pointscore lead by another point.
Monday I was back into the sanding and did very big day of alternate machine and hand sanding. I paid particular attention to the join between the cabin sides and top as this is the one we will see the most. A long board was used for the final fairing and I am pleased with the fairness of the line. I picked up today where I left off yesterday with more hand sanding and a final quick sand over all the deck with the random orbital sander with the vacuum cleaner attached.
It was a perfect afternoon for painting with a warm light breeze and low humidity so I mixed up a 4 litre can and got stuck into it.
The daylight ran out at the same time as the paint and I was happy to throw the disposable roller and brush out with everything painted except the transom.
I took a short break from sanding on Monday to pick up the kitchen sinks and today the oven and refrigeration kit arrived. The after dinner treat was open the packaging and check out the new arrivals so the rumpus room is looking even more like a boat shop.
Other after hours activity included ordering the shore power gear, the 240 volt circuits and the 22 litre hot water system.
Right on schedule I have paid the big deposit on the rig and set a tentative delivery schedule for early November.