Next Passion

Hatch covers lined up in the garage. All latches trial fitted and both sides glassed or saturated with epoxy
The garage has been a good refuge in the cold weather so I have taken the hatch covers there to finish the latch fitting, glassing and epoxy coating. I recycled the cut out from the top of the gas bottle locker to bond to the underside of the lid so that the lid locks in place. This takes the load off the hinges and hatch latch and also lets me glue in a slight curve in the lid. I am pleased with the latches as they are strong and the handles fold down out of the way. The anchor latch is the same as on the J122. The gas bottle and deck hatch latches have the same lift handle but are a rotary latch ideal for holding the lids down against a gasket. I am pleased with the glassing as tomorrow I can put the hatches back on the boat and keep the approaching wet weather out. In the spells of sunshine I have pushed on with sanding the epoxy coating on the deck taking turns to use the random orbital sander and do hand sanding in the corners or on edges. I have finished sanding the cockpit and transom and have about half of the deck to complete. I am looking forward to the first coat of white primer on the deck next week. Again in anticipation of a few days of rain I gave priority to sanding any bare timber and epoxy saturating that so as of tonight there is no bare plywood edges or timber exposed to the wet and all the fitting cut outs and fastening holes have at least one coat of epoxy on the plywood edges. I even saturated the bolt holes for the stem fitting with epoxy using a long thin brush and a lot of patience. That went better than expected and the surplus epoxy was still dribbling out hours later. The photo shows the hatched lined up in the garage with latch holes drilled and epoxy or epoxy glass coating depending on the hatch.
The garage for the companionway hatch is the last of the external wood work before the deck is painted. After painting I will fasten pre painted toe rails to the deck.
All the holes for the fittings that are drilled have been filled with epoxy twice to seal the end grain of the plywood in the holes. It helps to have willing crew to clean up the underside of the deck and fix masking tape over the holes so we can dab epoxy into them without dribbling it into the cabin.
The glass on the deck has been faired into the sides of the hull ready for the paint to go over the gunwhales and be blended in with the paint on the topsides. Again it helps to have crew who remove all the packaging tape from the edge. While sanding the gunwhale edge I have sanded a the top third of the topsides which had a few epoxy runs from the deck work and now it is looking clean again.
The weather could be turning wet again but I have accumulated a lot of internal jobs.

View of the hatch garage from the bridge

Close up of the water channels and hatch runners. Pretty much the same as our Jeanneau SO37

The hatch garage cleaned up ready for glassing but put back on show for the surveyor
Where plywood doublers are required under fittings I have been using temporary screws through the holes for the fittings to clamp the reinforcing to the underside of the deck. I have to be careful that the glue does not cure too much before taking out the temporary screws otherwise the screws will break. During the week I took gamble and left the screw extraction until the morning. I took to the task as soon as I woke and was lucky to get the screws out intact. I am not game to take the chance again and will wait up until the glue is just right tonight.
I still have about ten backing pieces to install including ones for fittings that I have yet to purchase. I need to get this job finished so that I can paint under the deck but it is a fiddly job and there is not much to show for the effort. The jobs that give most for the effort are attracting me so I have almost finished the companionway hatch. This seemed like a simple job but I wanted it to look classy so I have spent quite a bit of time getting the alignment just right and using spacers to keep everything parallel. I have put a taper on the runners and given the hatch garage side skirts for a bit of class. To ensure a good fit I used 1.6 mm veneer as spacers between skirt and runners and screwed the assembly to the runners while the glue cured. Plenty of kitchen paper made sure that the garage would not stick to the runners.
The skirts will be glassed to the garage roof inside and out to make it sturdy. I had thought of leaving the garage off as on my Jeanneau SO37 buy the garage is a neat way to keep the water out. What I have settled for is the same detail as on the Jeanneau SO37 but with the garage in front section. Behind the garage capping pieces keep the sliding lid in place and provide hand holds as on our SO37. These will be painted as I am tired of the continual varnishing required on the hatch trim on the production yacht.
Last Friday the crew helped with marking out fitting positions so we were able to drill all the holes for the Ronstan genoa tracks, the Spinlock rope jammers and deck organizers and the Harken winches on the cabin top. The fittings I still have to acquire are the cheek blocks for the genoa sheets and the jammers for the spinnaker kickers. That should leave just six pad eyes for the cabin top life lines, the spinnaker pole down and the baby stay.
The paperwork for the launch is progressing and during the week I obtained my MMSI number for Passion X so that the new VHF radio and AIS system are registered. I still need to get an EPIRB and have it registered before our first offshore venture but I am getting a bit ahead of myself.
Thursday should be another milestone if the new build passes Survey for insurance purposes. It might not be finished enough but it is a very good stage for an inspection before I cover all the structural detail with paint.

Looking out of the Didi 40 Cr through the clear perspex hatch and washboard

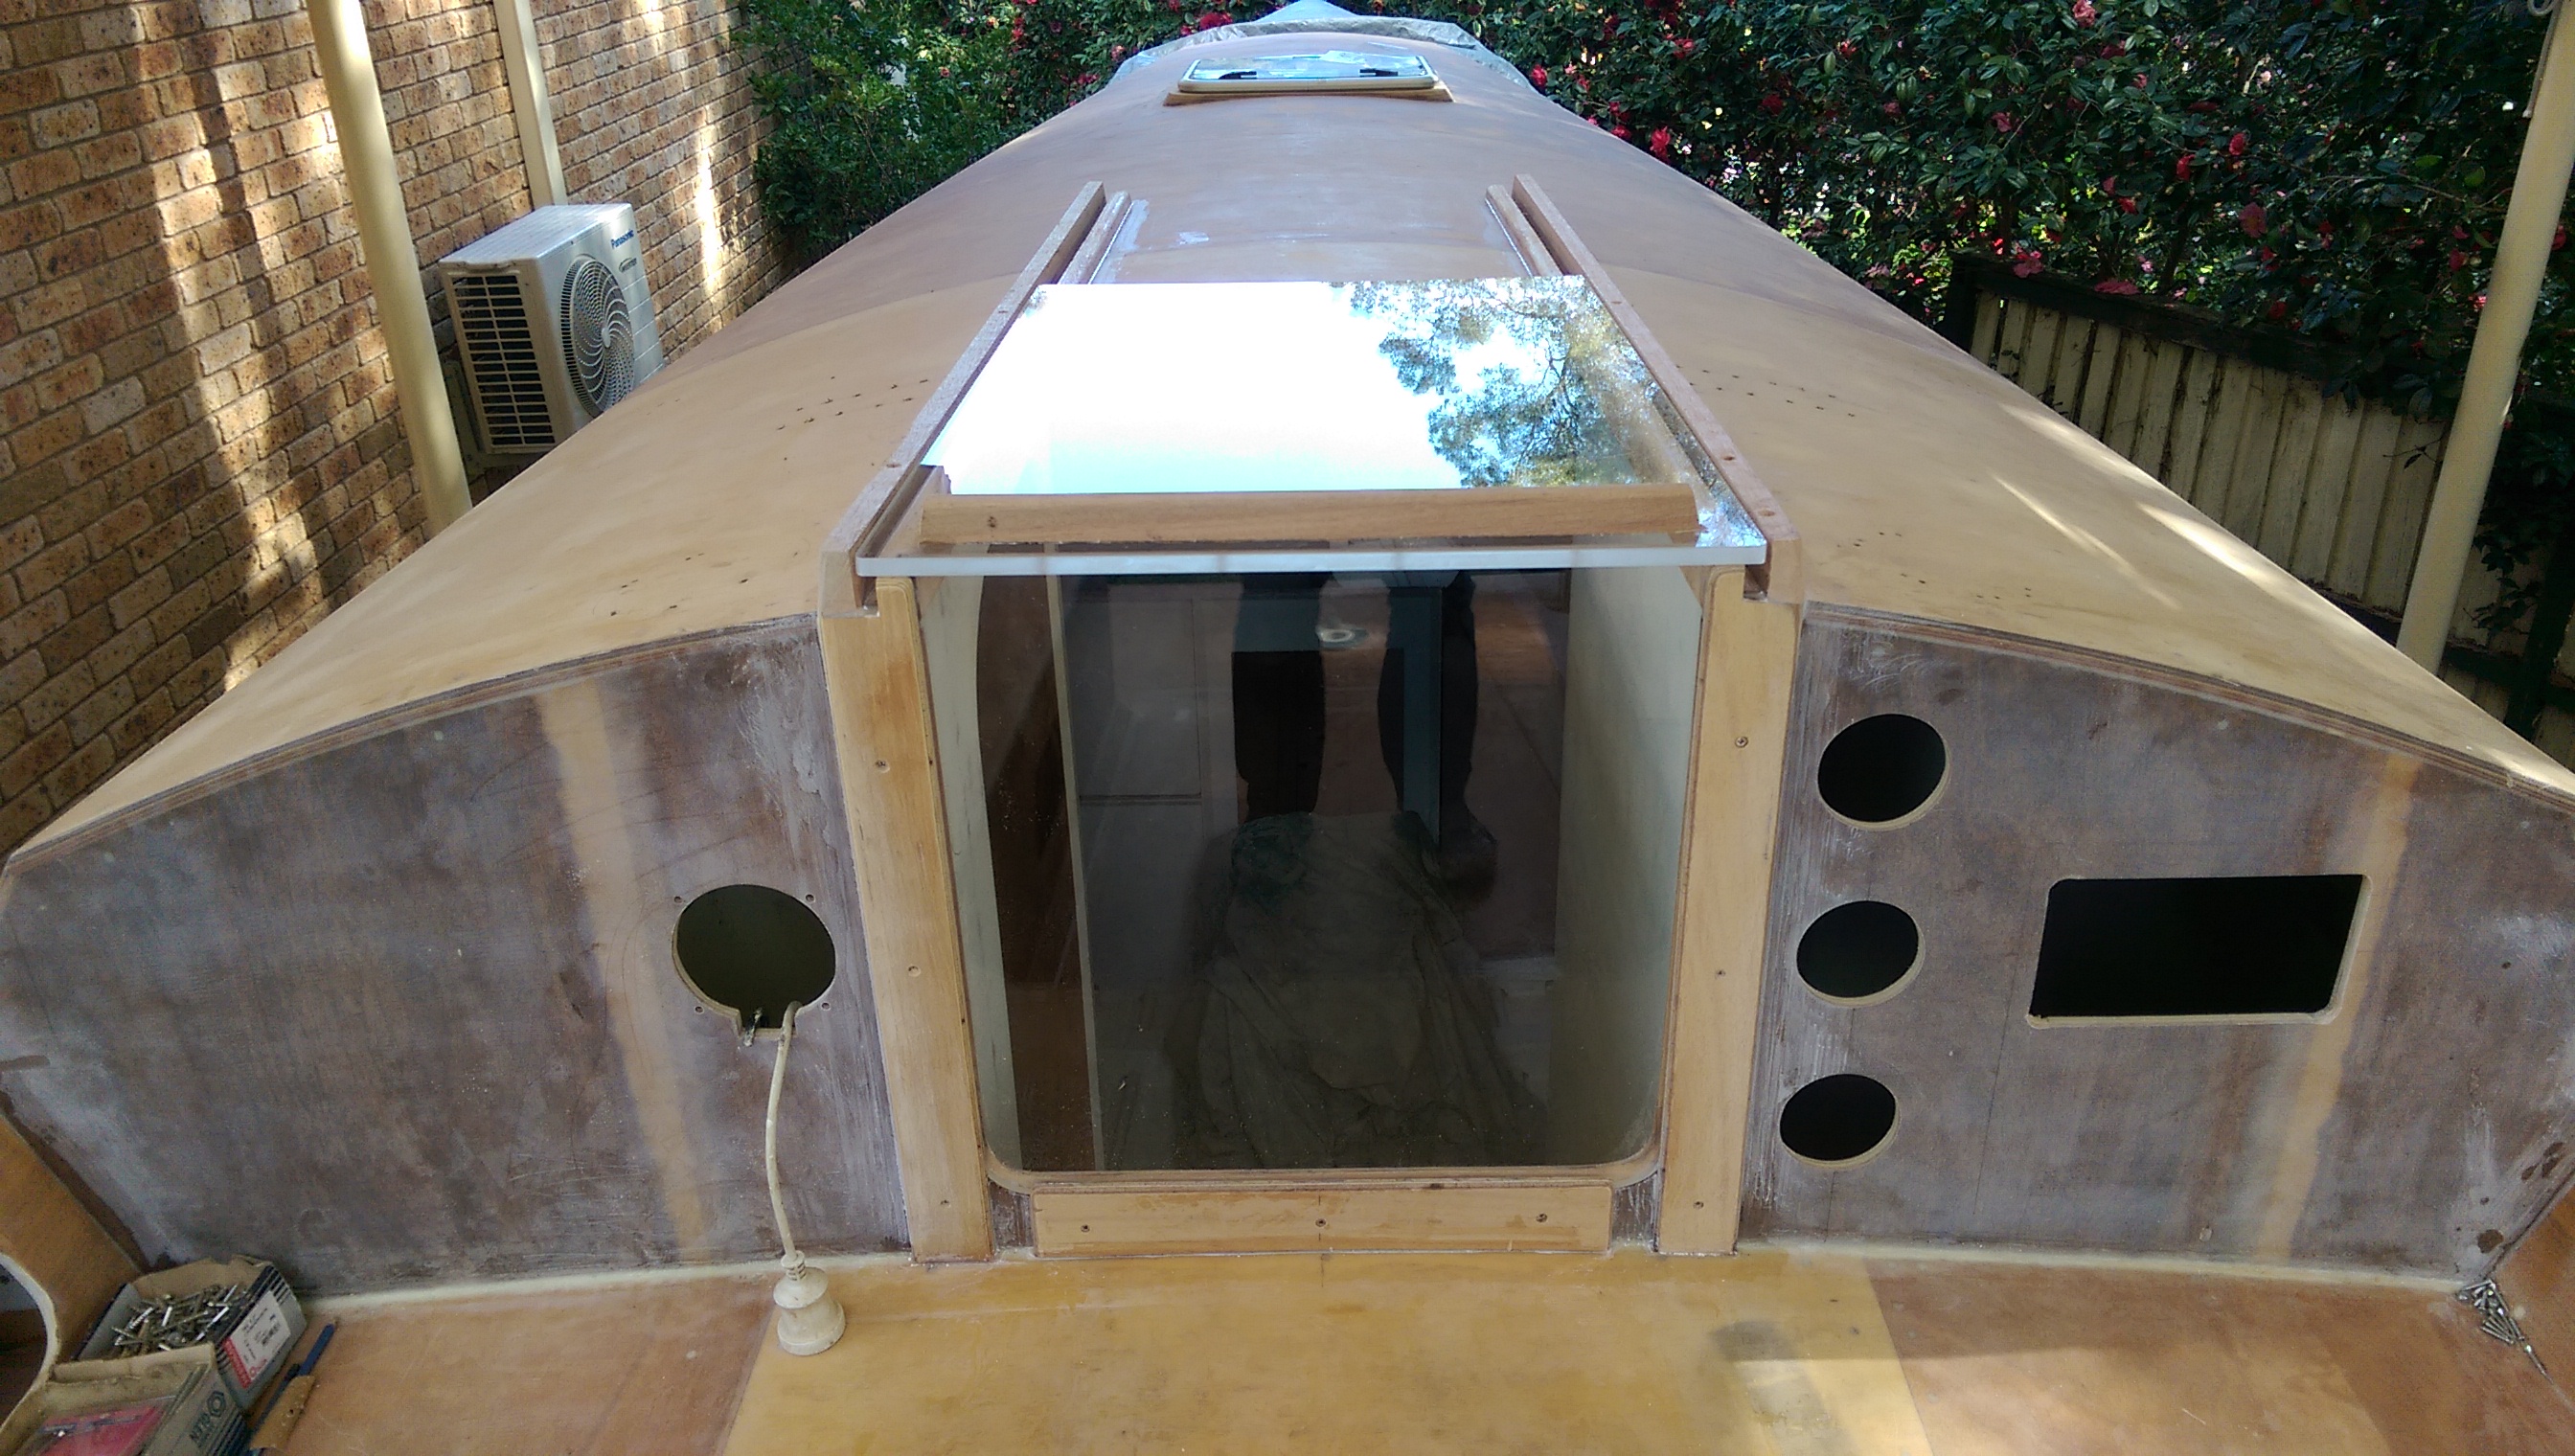
Looking at the companionway hatch and deck hatch from the front of the cabin
External view of the companionway hatch before making the hatch garage.

The hatch garage before trimming the excess plywood from the edges
I have taken a gamble with the weather conditions and made progress on the exterior of our Didi 40 Cr. The raised sitting area behind the coamings at the transom has been completed to match the gas locker lid appearance. The transom has had a light layer of epoxy glass applied and the coamings have been saturated with epoxy.
While the glass on the transom was curing I started shaping the surrounds for the hatches on the coachroof. Dudley suggested gluing the plywood to the deck and planing the ply flat to match the hatch. I preferred to make up the surrounds on the workshop floor where I could keep the inside edges of the ply layers vertical and then shape the underside of the cured assembly to match the curve of the deck. I needed quite a few trial fits to get the curve matching the deck but the layers of plywood provide very good guides for keeping the underside consistent. In the workshop I found it easier to shape the edges of the assembly than it would be once attached to the deck.
The rain did arrive just as I was cleaning up the excess thickened epoxy from around the joins but I did enough for a neat job.
It was sunny this morning and good conditions for finishing the clean up of the hatch surrounds and taking a few photos. Everything seems to fit well. Elaine gave her seal of approval and helped me put all the hatches and portlights away until the painting is finished.
The rest if the day was consumed with the companionway hatch surrounds. I wanted a bevel on the edge of the hatch edge runners so that meant a thicker piece of timber and some tricky angles to saw and plane. That and making up spacers to keep the runners parallel took up most of the afternoon and I never got around to cutting up the toe rails.
Good new is the edge runners are glued and screwed to the cabin top and tomorrow I will be able to remove the spacers and install the bottom runners for the hatch. On the outside of the hull that will leave just the toe rails to cut and install and it would be nice to have someone hold the toe rails while they are bent into position.

Trial fit of the first cabin top hatch surround on our Didi 40 Cr showing the sloping edges.

Completed cabin top hatch surrounds on our Didi 40 Cr

Front view of the hatches and portlights in our Didi 40 Cr

The house is in the way of a good shot of the port side and portlights.
These pictures of the gas locker lid show it raised 24 mm from the deck and also how the coamings fair into the locker lid. I have a matching raised section on the starboard side. The gap from the transom to the lid is to leave clearance so the lid clears the pushpit supports.
While the boat trimmer was measuring up for bunk mattresses and settee seats I was busy measuring up doublers for under the deck where holes have already been drilled for fittings. The ten backing pieces have been located from the dwindling pile of plywood offcuts and have been sawn roughly to size. That is tomorrow’s job.

Stern view of the raised gas locker lid

Quarter view of the gas locker lid showing how it is raised 24 mm from the deck and how it blends in with the coamings. I made the sloping rear of the coamings finish at 24 mm to match the locker lid.
I have more or less finished the lid to the huge locker on our wide stern version of the Didi 40 Cr. I have followed Dudley Dix’s details as closely as possible given the variation to the deck plan. In the case of the locker the lid is a few millimeters shorter due to the extra reinforcement placed around the frame at the point the cockpit widens out. The frame is 9 mm ply and to which a double has been added extending back below the deck so that the deck is bonded to the 18 mm thick section of the frame. Because I did not want just an 18 mm thick edge to the end of the locker I added two 12 mm packers before the start of the water trap. The timber of the water trap is 19 mm thick and then there is another 12 mm ply inner edge to the water trap. If you add all this up there is a cross section 83 mm thick and 40 mm deep at the aft end of the locker. That will be a good strong point to harness attachment loops.
Under the lid I increased the depth of the stringer from 35 mm to 44 mm so that the lid would not deflect during the bending of the ply around the slight curve of the cockpit seat and for support once completed.
The lid looked so good when I cleaned up the edges this morning that I felt compelled to add the hinges and check the clearances. A little bit of timber had to be sanded off the back edge of the 12 mm ply water trap to clear the rear cleat on the lid. Once that was done it worked just like a bought one.
That inspired me to complete the gas bottle locker lid which is out in the cold and dark waiting for the fast cure epoxy resin to do its job. The gas bottle locker lid has been raised 24 mm above the side deck so that water washing past the coamings has to go all the way to the transom and in most conditions the person sitting on the wide deck will have a dry bottom. There is a broad 12 mm deep lip around the top of the locker that the 12 mm ply lid will sit on. I will form a flexible gasket in situ to make sure the lid is gas tight. The edge of the lid back has been trimmed to the same slope as the coamings so that there is a continuous line from the start of the coamings to the transom and a neat finish to the end of the coamings. On the other side there will be a dummy lid to keep the seat above the side deck by the same 24 mm.
If it is wet tomorrow I will try to finish the doublers under all the deck fittings and if it is dry and sunny I will do the external glassing on the cockpit coamings. I cannot make too much of a mess as I have someone coming to measure up the bunk and seat upholstery. This morning I registered Passion X with the NSW Roads and Maritime Services. I must say the staff at Services NSW were most helpful and the task was quite painless. The only disappointment is that they registered it as “unknown manufacturer” as there is not a category for owner builder. The registration number is AIV947N.

The hinged locker lid almost ready for glassing. Note the thickness of the aft edge of the locker.

About 30 pieces of timber were used to make the water trap and locker lid.
Lots of jobs part finished. The coamings are glued and screwed in place and today I finished the fairing pieces where the coamings return to the cabin sides. Lots of tricky angles to get right but the final appearance justifies the work. The locker lid is part finished in that it is glued up in situ waiting for the glue. To get the curve in the top of the locker lid to match the seats I had to use two layers of 6 mm plywood. When the glue cures the curve should be locked in place.
We did a big shop on Friday for the instruments and later had a working bee with the crew to drill holes for the deck fittings. It was a very productive day so I have ordered more deck fittings ready for the next working bee. On Saturday I continued with cutting holes for the fittings including most of the instruments and started on the cockpit locker surrounds that the lid fits into. I ran out of time on Saturday and on Monday it took several hours to finish the cockpit surrounds and make a start on the fairing for the coamings. When night fell I retreated to the garage and started fairing one of the
cabin top hatch surrounds. These are made of plywood and shaped to go from the curved cabin top to the flat of the hatch.

The transition piece that fills in the gap between the coamings and the cabin side looks very modern

Finishing off Friday’s busy bee on Saturday by cutting more holes for the instruments

The glue in the cockpit locker lid is curing while the lid is secured in situ.

One of the cabin top hatch surrounds is party faired. need to finish this one and trim the second one that is waiting in the garage

It is two years since I asked Dudley Dix to redesign the cockpit to my liking and I am delighted with the result
With the underside of the cockpit coamings painted white and the last of the deck covered in epoxy glass I woke early to put the coamings back on the deck and take a photo. I still have to glue and screw the coamings in place but I am happy with the final shape.
All the deck is not glassed with the exception of the transom. The sugar scoop stern is completed and glassed but there is still the locker lid and hatch surrounds to do. The photo shows the tiny beads of epoxy bog filleted into the corners to ensure that there are no air bubbles in the epoxy glass coating

The painted underside of the coamings just before mounting them on the deck

The sugar scoop stern ready for fibreglass, paint and a name


Glass reinforcement under the winch bases. One is finished the other still has a few layers to go
Like the cattle herd that stampedes towards the water hole I can smell the water and am pushing hard to get the yacht completed. I wanted to see what the stern would look like once finished so I pushed hard to get a photo opportunity late today. Ron gave me a hand on Friday to glue the panels he had cut into place. I had planned to leave the glue to cure for a couple of days but Friday was so warm and warm so late in the night that the glue was rock solid by Saturday morning. That gave me the chance to glue on the capping pieces and let them cure over Saturday night. By late afternoon the glue was cured enough for me to trim the excess and take the photo as the sun was going down. The reinforcement for the winch based under the cockpit coamings is also completed so tomorrow after a final sand I will coat the insides with epoxy primer. On the exterior the woodworking jobs to go are the mast step base, two cabin hatch surrounds and the detail around the companionway, the locker lid and the gas bottle compartment lid. These are not too complicated so we shall see how we progress this week. There are still toe rails to do so perhaps I should make up my mind what timber to us and order it. I have started to buy fittings so that we can drill the holes and locate the areas that need reinforcement. I want to add any under deck reinforcement before I paint the underside of the deck.
The coamings now have the four fibreglass winch bases cut in and bogged in place ready for the final glass reinforcement. The first job today was to trim the excess glass from the last two winch bases and vacuum up the fibreglass dust. I took the port coamings to the garage to cut the holes for the winch bases. Before fitting the bases I trimmed the excess plywood from the joins and vacuumed up the wood dust. Because I could turn the coamings around I found it easier to power plane the excess plywood in the garage than it would have been if they had been glued to the deck. Once the port coamings were ready to fit the winch bases I retrieved the starboard coamings from the hull and finished the fairing on those. I reused the temporary supports from under the starboard coamings on the port side and there is a photo to show how they fit. Several vacuum cleans of the garage later the winch bases were ready to bog in place. Even with winter hardener the epoxy filleting around the bases was going to take all afternoon to cure and I had other jobs to do. I have been putting off finishing the sugar scoop stern because it is a fiddly job and there is not much progress to show. However with mates coming tomorrow to help fit the inside liners there was a deadline to meet to glue all the pieces into place. The task was neither as difficult or as time consuming as I had anticipated and in a short afternoon they are all glued in place. I have used the final capping plywood as a gluing guide for the infill pieces. By temporarily screwing the capping plywood in place and by protecting it with kitchen paper I was able to clamp each of the pieces to the plywood capping piece. Tomorrow when the glue has cured it should be a quick tidy up before fitting the inside liner of the sugar scoop stern. As a bonus the capping pieces are ready to go and the wood dust is vacuumed up too.

The underside of the starboard coamings showing the temporary supports which held the winch bases in place while the bog cured. The temporary supports were reused on the port side.

Four winch based for our Didi 40 Cr. The coamings have been trimmed in the garage.
After a pleasant break visiting family on the north coast it was back to the cockpit coamings on Saturday and Monday. On Saturday I finished the third coat of varnish on the bunk tops and they are stored away for now.
In the coamings there are pockets for storage and also for access to the underside of the winch pads. I marked and cut these and then glued up the starboard coamings. Time was getting away so Elaine held the work light up for me as I finished gluing and screwing the panels together. Sunday is a church day but our prayers for wind for the afternoon winter race were unanswered. It was however a nice warm sunny day and the complimentary BBQ back on the deck at Greenwich Flying Squadron made it one of the best afternoon of the winter.
Today I laminated up the first winch base in a bucket and while it was curing removed the starboard coamings from the deck. To my relief they came away easily and the underside is very tidy and ready for glassing. Next task was to glue up the port side coamings making sure that there was enough kitchen paper under the cleats so that any surplus glue did not stick it to the deck. By this time the first winch base had cured in the warm sunny position I had placed it so I could remove it from the mould and start the second one. I had visions of doing a third winch base in a second mould but time, light and energy deserted me so best to leave it for the morning. With luck I can do the two in the morning and still have them cured by the afternoon. The plan is to cut out an oval section of the plywood on the coamings and insert the winch bases into the hole and laminate the base to the coaming from below. Eight layers of 450 gram glass will give 4 mm of cured laminate equivalent in strength to 12 mm plywood. By the time the base is glassed in it will have 16 layers around join. The winch base will have a 12 mm plywood backing piece bogged in and glassed over. Hopefully the forecast rain will not stop any of this activity. The location of the winches proved a bit of a mystery. Dudley had three versions of the deck for the Didi 38, the extended Didi 40 with the long racing cockpit and the Didi 40 Cr with the shorter cockpit and longer cabin. Each version has a different winch base position. Our version has slightly shorter coamings because they finish where the cockpit widens out. By luck or good design our winches seem happiest located right in the middle of the coaming pockets. At 700 mm from the cabin and 700 mm spacing we have excellent access to the bolts under the bases and it looks very symmetrical. Our rear winches will double as running back stay and occasional spinnaker sheet winches so being located a bit further aft is appropriate. It is very much in the fashion of the more modern cruisers where one winch is in easy reach of the helm position. With our wide cockpit the coamings are 125 mm further outboard and they line up very well with the genoa cars so I might see how we go without cheek blocks on the coamings.

Elaine inspecting the anchor locker hatch last week

Starboard cockpit coaming half way through being removed from the deck for fitting the winch pad.

The underside of the coaming ready for glassing of joins

Winch pad mouldings. One made, one curing and the mould for a third ready for the morning

Trial fit of the first winch pad. It will be 30 mm lower when recessed into a hole in the plywood.

Port side prepped with kitchen paper and ready to apply the glue to the cleats and plywood.
It was not quite a rerun of last week as the breeze was a couple of knots stronger and the chill factor a few degrees worse. As the breeze gusted up the lane Cover River straight into the doors of the club I was anxious about taking the tender out to Passion on the mooring. The crew from Aggrovation arrived having decided that Aggrovation was too exposed to the wind to board. They kept a watch on me as I rowed out to Passion and all was well close into the Greenwich hill.
On the water we did tack the No 3 genoa down to the deck and we did start with a reef in the main. On the run down the genoa was often blanketed by the main and often it was too tight to have the genoa poled out. Eventually we worked to windward enough to set the pole and from then kept in contact with the fleet. We did hit 8.9 knots in one spell which is a recent record and probably more reliable than just the speed through the water reading.
Immediately we turned the mark for the beat home we put in the second reef. I could see from the speed over the ground that we were going faster than last week with the two reefs in so I will concede that we would have been faster last week with one reef in. All around us our competitors with single reefs were having trouble while Izzi with a double reef was doing similarly well to ourselves.
Upwind the boat speed was at least a knot faster than last week. With the smaller main I could maintain shape in the genoa. L’Eau Co was alongside us again and this time we pulled away on the work for all of the race and not just the last dash to the finish. Izzi had run to the top mark faster but we were pulling her back ever so slowly on the beat home.
Around Shark Island we hit 8.3 knots with the double reefed main and I did promise the crew we would go at least three knots faster in the new Passion X in those conditions. I know the prototype did hit 17 knots with poled out genoa down a wave so I think I am on safe grounds with the speed promise.
Passion did hit 7 knots to windward at height similar to the other cruiser racers in the fleet and I confess I am less confident about the upwind speed of Passion X. We will have 13% more righting moment on a boat that is 25% lighter and 10% longer so I will be disappointed if we cannot be half a knot faster to windward.
On the work to the finish we passed Larrikin and drew further away from L’Eau Co but did not quite catch Izzi. Amante and The Biz took the major places while we scored a very safe third. If we can sail as well every windy day I will be very pleased.
We increased our lead in the series by a couple of points but a few behind us have 25 point races to drop which will bring them closer.
A bonus photo of progress on Passion X is included. It was so windy I had to take down the tarpaulin covering the stern and so could get a better picture of the coaming around the cockpit.

Worried about rowing out to Passion with all the white caps on the water

Progress on the coamings on our Didi 40 Cr Wide Stern version
Now that most of the deck is protected from the wet by the epoxy glass coating I have started on the cockpit coamings. Coamings are a raised border around the cockpit to keep out the water. They also act as a back rest when sitting in the cockpit and sometimes can act as a seat when sitting outboard when the boat is heeled. It has taken two days to cut all the odd shaped longitudinal stringers and cleats as well as the odd shaped panels of plywood that form the coamings. They are all screwed into place temporarily. I propose to glue all the parts together but not to the deck so that I can remove the formed up coamings and turn them upside down to glass inside. That way I can incorporate the winch mounts as hollow structures glassed into the coamings as you would expect to find on a production yacht. i have a couple of plastic buckets ready to laminate up the winch bases and I might cut up one bucket and put it on the coamings just to see if it looks right.

First look at the cockpit coamings on our Wide Stern version of the Didi 40 cr

View down the starboard coaming on our Didi 40 Cr. The seat on the deck behind the coaming feels like a good helming position
We had just enough fine weather and just enough fibreglass cloth to complete most of the glassing of the deck of our Didi 40 Cr before the rain really set in. Thursday and Friday have been awful boat building days but with Kevin’s help we fitted the two chainplates on the side decks and the two plates for the running backstays. Late on Thursday I spent two hours hand sanding the roof beams in the cabin. Today was even more inclement and a meeting of the Sydney Harbour Users Group was a welcome break from the dust. This afternoon I donned sanding gear and spent half a day machine and hand sanding the roof in the V berth.
While I dislike the wet and cold there is much to do inside and once kitted up for the sanding it was quite comfortable lying in the V berth and looking up at the ceiling. A 100 mm foam mattress would have made it so much more comfortable.
Not wanting to leave too many tasks to the last minute I have lashed out and put a deposit on a new fat head mainsail. I had thought to get on the water with a modified pin head main off Passion and see how it went but as time has marched on all the trialing time has gone and we will need the new main at launch. In building the new yacht I made was determined not to go too high tech or add more expensive equipment than you would find on the average stock production yacht. What we have on Passion is the benchmark for what we will have on Passion X. That means the mainsail will be a radial cut from woven cloth. I am very keen on carbon for the genoas as the low stretch keeps the flow in the right position. With the mainsail supported on the mast I am less concerned for stretch and more concerned for reliability. I have gone for the Hydra Net Radial cloth as the lightest woven that will be suitable for the very low displacement of the Didi 40 Cr. I hope it is the right decision.
I have also put down a small deposit on the rig so that they can proceed with production drawings ahead of the full deposit that needs to be paid eight weeks before launch.
Inside we can measure up all the cushions and get these under way.
As a reminder of what the rig should look like I have included a sketch.

The very slightly larger rig on our Wide Stern Deep Keel version of the Didi 40 Cr
At last I am happy with the fairing of the gunwales and have moved on to glassing the deck. I am about a third of the way through and need at least three fine days to finish the deck. In the photo you can see where the layers of glass join and overlap. I am using two layers of a light glass cloth hoping to get a smoother finish than we did on the hull where I used a heavy double bias cloth. The glass cloth was first purchased about 25 years ago when I was building vacuum bagged foam fibreglass NA14’s. I am going to run out before the job is finished so do I buy just enough or get another roll for 25 years supply? On the wet days I have finished the first sanding of the ceiling, epoxy coated the laminated roof beams in the cabin and started sanding the epoxy ready for the first coat of paint on the ceiling. The crew helped fit the Vetus exhaust hose and that took very little time as it went to plan and followed all the planned curves. We also progressed the bits and pieces of timber needed to complete the transom sugar scoop stern. About 24 individually shaped timber pieces are needed and each has to be glued in place in order. It is like having a kit delivered ready to go on the first suitable occasion.

One third of the way through glassing the deck of our Didi 40 Cr